How we designed and hacked our IKEA kitchen (and what it cost)
Is this an IKEA kitchen? Which one is it? I get asked this a lot. The answer is “yes” and “no”. Everything that you see is either bespoke or purchased seperately. What’s underneath is IKEA. The entire kitchen is built on IKEA carcasses, which makes it incredibly flexible and also helps to save the pennies too. I decided to write this blog post to share with you how we designed and created our kitchen, and how much it cost (the kitchen only – not the build) to help you decide if you want to do something similar.
Before we started our house renovation and kitchen extension I actually hadn’t given the kitchen much thought. Which is odd considering it is so important. Instead I was focused on getting our plans for the extension off the ground and finding a good builder. What I did have were two requirements for the kitchen – it needed to be modern and it needed to be black.
It was during the first meeting with our builder when we were scoping up the project who suggested using IKEA carcasses and building a bespoke kitchen around that. And, that is exactly what we did with the carcasses coming from IKEA, the door and drawers created by our builder’s joiner, the appliances from AO and the worktop from Rock and Co. To be honest I was a little nervous at first about doing it this way – getting the carcasses from one place, the doors from our builder, the worktop from somewhere else, and all the appliances from another retailer. But with careful planning it’s fine, and here’s how we did it…..
The layout
Once we had the plans back from our architect we knew where the kitchen would be positioned in the room, we knew roughly how much space we had for the island, and roughly where the appliances would be located. All of this helps to determine the kitchen layout, give or take a few changes and measurements. Do bear in mind that when doing a kitchen extension you are essentially working with a blank canvas or something that doesn’t actually exist yet so there are likely to be changes as the build progresses.
Our next step was to take the architects plans and turn them into a kitchen plan. We headed off to IKEA who created a plan for us based on IKEA supplying the entire kitchen including appliances and doors fronts (which is how they work during the planning stage). I think that they thought I was a bit mad when I explained we would only be buying the carcasses and the rest we would sort out ourserlves. But that’s ok, the beauty of IKEA is that you only buy the bits you need.
The kitchen carcasses sold at IKEA are all named METOD which I will refer to blog, just in case you’re wondering.
The kitchen wall
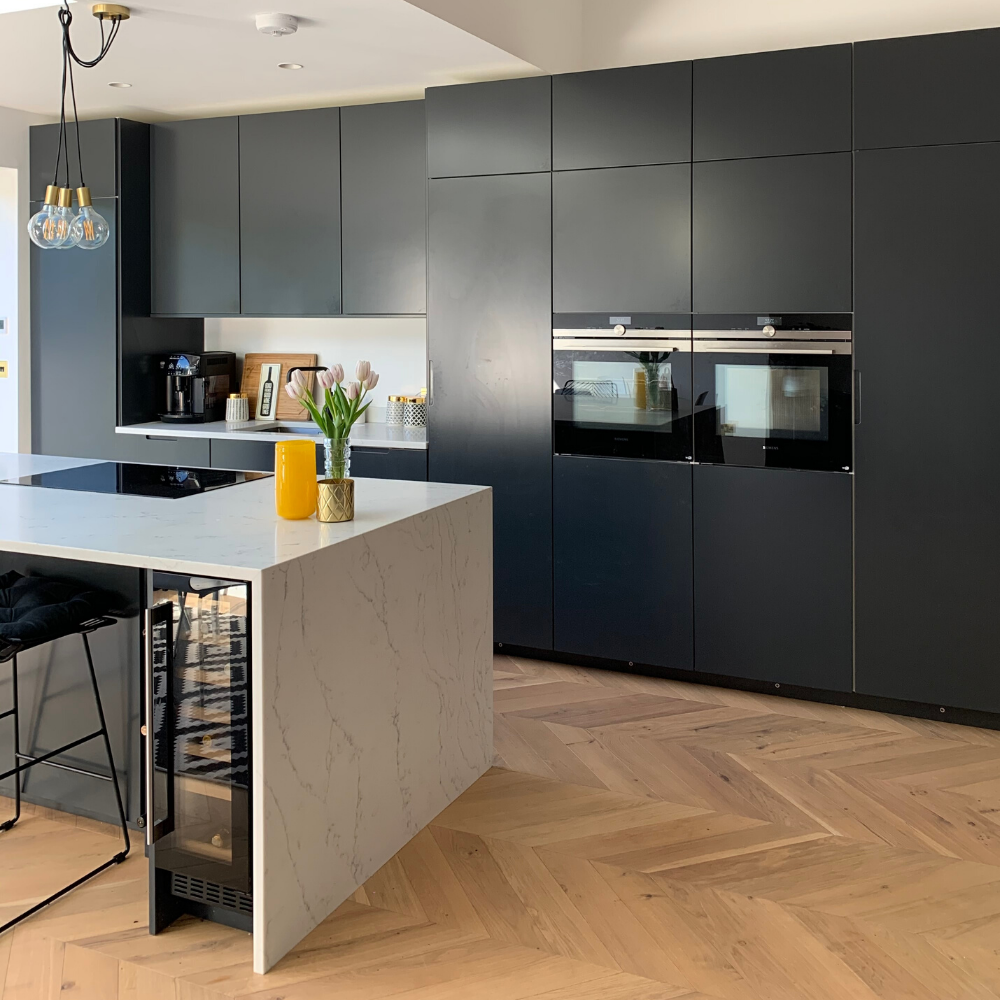
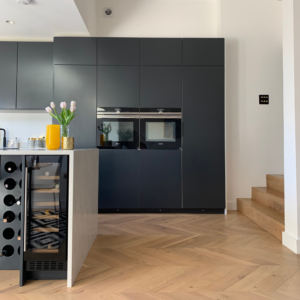
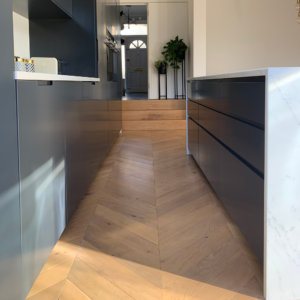
The side wall of the existing kitchen and the kitchen extension is where the main kitchen units are located, and we have a run of eight units here. Each unit is a standard 600mm wide and we were lucky to just about squeeze in the eight units that I wanted. This is made up of the following…
- 1x 2000mm METOD tall cupboard for the boiler
- Dishwasher (no carcass is needed for this)
- 1 x 600mm METOD cupboard for under the sink
- Freezer (no carcass is needed for this)
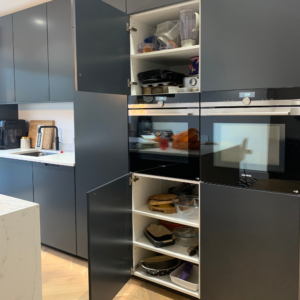
- 1x 2000mm METOD fridge carcass to house the fridge.
- 2x 2000mm METOD oven carcasses. The oven sits in the middle of the carcass allowing us to have a seperate cupboard above and below it.
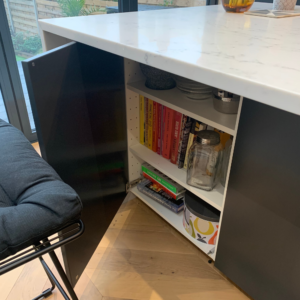
- 1x 2000mm METOD tall cupboard for the larder at the end of the kitchen that contains 5 drawers and 2 shelves too. I have filled the shelves and drawers with the IKEA VARIERA white storage boxes for organisation.
- 3x 1000mm METOD cupboards that are 370mm deep. These are positioned above the sink for glasses and cups.
- 5x 400mm METOD cupboards that are 600mm deep that sit on top of the boiler housing, fridge housing, oven housing and the larder cupboards.
- Overall we have 15 cupboards along this kitchen wall.
This list is running left to right following the image below.

The total height of the kitchen extension is 2560mm and I wanted the kitchen units to run as close to the ceiling as possible. From the plan we knew that we needed tall units and IKEA supply tall units in either 2000mm or 2200mm high, which didn’t quite work alone for our ceiling height. To get around this we opted for the METOD 2000mm tall cupboards and placed the METOD 400mm cupboards on top. The kitchen is tall, and I can’t really reach the very top cupboards, but it needed to be this tall to work and fill the height of the extension.
The IKEA Metod system is really flexible, so don’t be afraid to think slightly outside the box and consider stacking the METOD carcasses to create the extra height should you need it.
One of things to consider is that IKEA cupboards do not have a service void, but personally I didn’t find this to be a problem. This is because the back of the cupboards have slot for the pipes to run out and then these ran underneath the carcasses. We also have a void of 400mm deep behind the walled kitchen area which became known as the “Brexit” cupboard during the build, and I think that this space helps with the pipework etc. In fact a lot of our services in general run inside this gap. The only cupboard that our builders had to hack into was the boiler cupboard to fit around all the pipework and the underfloor heating manifold, it is slightly messy, but it’s a boiler cupboard that we are not looking inside every single day so I’m ok with it.
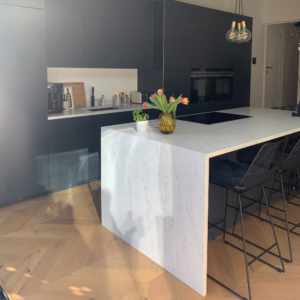
The kitchen island
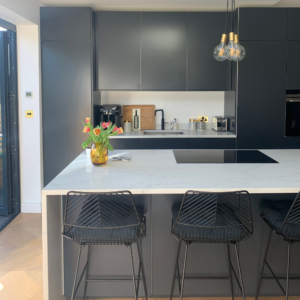
The size and positioning of the kitchen island was one of those decisions that I took a long time over, it had to be right. I wanted it to be as big as possible but also not to be overpowering for the space, allowing us to have room for a dining table the other side. Working this out with a shell of a room was really tricky, so my advice here would be to mark it out on the floor with chalk. I wanted the island to be 1200mm wide and 2400mm long, but I also needed 1000mm for the gap between the island and the opposite units, and then 2500mm the other side for a table. Luckily we just about have this space available so we went for a 1200mm x 2460mm kitchen island in the end.
This has allowed is to have the following….
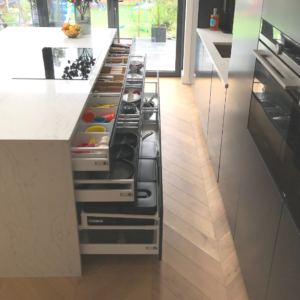
- 3 x 800mm METOD drawer units on the front of the island containing 9 drawers in total. Six are 200mm deep and three are 400mm deep
- 3 x 600mm wide cupboards on the other side facing the dining table. The shallowest depth of a cupboard that IKEA make in the METOD range is 370mm deep, which is too deep to allow enough leg room for the stools. So we got our builder to reduce the depth of these cupboards to 300mm.
- 1 x bespoke red wine rack 300mm wide
- 1 x 300mm wide fridge
- Overall we have 9 drawers and 3 cupboards underneath the kitchen island.
The doors and drawer fronts
All the door, drawer fronts and red wine rack were bespoke made by our builder’s joiner as part of our entire project. Each one is professionally sprayed MDF in a colour match of Farrow and Ball Off Black, with 20% sheen, and they are really nice doors, although I am slave to keeping them clean.
We pretty much had free reign of what the doors looked like and I really wanted a simple door, ideally handleless on push catches, to create a clean and simple lined look. We did have to compromise on the doors to the appliances that needed a cut out handle due to weight of the door, and we were advised to have a cut-out handle on the larder cupboard door due to its size and it needed to be opened all the time.
The island drawers have J groove handles running full width of the drawer, again creating a clean and simple look to the island unit.
IKEA kitchen storage
One of the best things about IKEA METOD kitchens are all of the storage options that are available once the kitchen is fitted. The storage options are not something that you add to your overall kitchen order, instead these are items that you pick yourself from the showroom or the warehouse.
To decide on what we needed for the drawers I first worked out what each drawer would be used for. Here’s what we have in the island….
- 1 x 200mm deep drawer for kid related stuff such as plastic bowls and cups. To organise this drawer I have used eight IKEA VARIERA white boxes.
- 2 x 200mm deep drawers for cutlery and utensils, and I have used the IKEA VARIERA bamboo cutlery trays to organise these.
- 3 x 200mm deep drawers for crockery. To stop the plates and bowls moving every time I open the drawers, they sit on the IKEA PASSARP grey drawer mats
- 1 x 400mm deep drawers for my bins. I have arranged this to include one bin for general waste, one bin for recycling, one for food waste and another to store the bins bags etc. The bin system I have used is IKEA VARIERA/UTRUSTA bins and bin frame. Oddly on the website it says it is the last chance to buy these, so I wonder if it is changing to something else.
Delivery and installation
As you know anything that you buy from IKEA arrives in flatpack boxes, so be prepared for hundreds of boxes to arrive and so much cardboard! We must have had about 200 boxes turn up, plus thousands of other bits like hinges and drawer runners, and I still have loads of these left over. Because we were living at home during our renovation obviously space was really tight so it was a matter of ordering the kitchen only when we needed it delivering. The delivery only took about 5 working days from order which is great.
I also had to think about the appliances and making sure that these arrived pretty much at the same time as well. All of our appliances came from AO, making it really easy to set the delivery date.
Our builders put together all the carcasses and installed them into the kitchen. My one tip here is to make sure that they have the plan, talk them through the plan, give them the order list from IKEA so that they can check what is what and where it is going. Also make sure that you check the delivery yourself against the original order list. Sounds simple, but when there are hundreds of boxes and a building site, it can get quite complex.
What I’ve learned having hacked and customised an IKEA kitchen
- There is so much flexibility with an IKEA kitchen, like there is with many other kitchen suppliers. You can basically build it as you wish to fit your kitchen. Doing it this way allows you to have your exact door style you want to match your requirements and interior design finish. Overall I think it does also save you money as you can then spend more on what you see rather than what’s hidden underneath.
- Think about where your hob and sink are going to go, you need to know this from the very start of your project as it will impact the electrics and plumbing. The electrics for a hob will need to be placed into the floor screed so it can’t be an after thought. If like me you like a tidy island I would avoid having a sink on it, as it will just end up cluttered with dirty dishes and looking messy.
- Once you have your kitchen plan 100% locked down give it to your builder so they know what on earth you’re doing. In our case we did this as our builder was creating the bespoke joinery (doors and drawers) for us. But you will also need this for the electricians and plumbers to figure out where they need place all the sockets and pipework.
- IKEA have both white and black carcasses, and one of the things that I wish I had done was have black carcasses. Our doors are black, I do have some slight niggles where I can see a little too much white carcass on display between the shadow gap. But having white carcasses show up less dirt inside the cupboard than black carcasses would.
- When you’re ordering ANY IKEA kitchen items you need to order it from the kitchen section in-store, the items are not something that you can pick yourself in the warehouse. Instead you order it, pay for it, and then get a text message letting you know that you can pick it up from the customer collection point.
- You can order the entire kitchen online for delivery, personally I would avoid this option. It sounds easy, but remember you are ordering hundreds of items and you really don’t want to be short on hinges or legs. Let the team in the showroom place the order for you based on your plan. They will take off all the items that you don’t need. I mentioed at the start of this blog post when they construct the kitchen plan for you, the doors and appliances are all included. The staff at IKEA will take all of these items off so that all you are ordering and paying for are the carcasses based on your original kitchen plan.
- Consider and work with your builder when everything needs to be delivered. There is no point getting it delivered too early or you will just have loads of boxes sitting around the house taking up space and potentially getting damaged. For most things you can set the delivery date and change it if you need to. I think I must have rearranged our appliance delivery a couple of times and it was absolutely fine.
- We opted for a Induction hob which meant that most of pans no longer worked, so we used trusty IKEA again to buy new stainless steel pans, and so far so good.

What it all cost!
I’m guessing that this is the bit that you’ve been waiting for or the part that you’ve scrolled down to find. Here’s a breakdown of what we spent on the kitchen. These costs are JUST FOR THE KITCHEN, and do not include any costs for the extension, flooring, bi-fold doors, lighting etc….
- IKEA METOD carcasess – £1.8k
- Bespoke joinery doors, drawer fronts and under island red wine rack – Approx £4,000.00
- Appliances. We opted for a Neff induction hob, 2x Siemens ovens (one is a single oven and the other is a combi-oven with microwave), Neff tall fridge, Neff freezer, Neff dishwaster, Amica wine fridge and Quooker tap. Approx £6,800.00
- Worktop is Urban Quartz Monte Carlo Calucatta from Rock and Co – £6,000.00
- IKEA storage accessories – Approx £200.00
- Tiling – £700.00
- TOTAL – £19,550.00
On top this there was the installation cost which was wrapped up in our extension cost, but I think that it was about £2,000.00. The overall cost of the kitchen could have been cheaper by choosing a different worktop and cheaper appliances, or going with a different kitchen supplier, or it could have been more expensive. It’s totally up to you how much you want to spend and what you want to have in your kitchen. We wanted our worktop and appliances to be a high quality and that it why the price for those is high.
If you haven’t found a perfect faucet for your kitchen yet, you can choose something suitable from this article https://wisepick.org/
So that’s it. Such a long blog post – possibly my longest ever. I really hope that you have found this useful. Do let me know if you have any questions.
Claire x


18 Comments
Eric White
It looks beautiful… indeed having a good kitchen the must-have thing to have… thanks for sharing give me the idea how much it cost to update mine 🙂
prakash
It was a very nicely written article. I like to read it. It was totally informative and topic you covered here, I am totally agreed with you. I must say that I have learnt so many things from it.
Steven Lee
Hi Claire,
Your kitchen looks great, I was particularly interested in your blog as the kitchen is very similar in size to the extension we are currently having built and the design also very similar to what we are going for! I did have one question I was hoping you can help with. I have been wrestling with how a vented hob will work on our island as they have venting pipes at the back that may stop us having draws as they wouldn’t be able to close fully and the venting hobs also cost a fortune! I noticed that you went for a ceramic hob on your island but can’t see how you are extracting. Do you just open the bifolds when you use it? If so how does this work? As this could be the answer to my problem. Any help appreciated.
Thanks,
Steve
The Pramshed
Hi Steven, apologies for the delay in reply. We have an induction hob and we have our extractor fan on the wall above the tall units, its a small white one. I didn’t want any extraction on the island as we barely use them.
prakash
hi, great post! It was a very nicely written article. I like to read it. I must say that I have learnt so many things.Keep posting! Thank You.
TMB Development
Changing up your flooring is a guaranteed way to enhance the look and feel of the whole area, and you shouldn’t struggle to find surfaces that are both stylish and practical. Ideally, your floor should be durable and hard-wearing, and it should be able to cope with potential splashes, spills, and splatters that may come its way on a daily basis.
Elizabeth Paige
Wow! I love how you maximize the table over there to become a storage at the same time. Now I got an idea how to reorganize my kitchen. Thanks for your great post and looking forward to more similar articles.
HomesCute
What a beautiful kitchen! Great post and lovely kitchen! We’re getting ready to deal with several kitchens remodels at rental properties, and are considering IKEA cabinets and Semi handmade fronts, so it’s good to read what you’d do differently. This is such a useful post. Thanks very much for sharing!
Jemma
What a gorgeous kitchen! That island is really to die for, perfect shape and size for the kitchen with a ton of pull out storage, love it, thanks for sharing.
farmhouse furniture
Proper interior design helps to ensure that a living space or office will fulfil its purpose. A poorly designed house may be reasonably large but it may not provide the occupants with the space the needed.
Safia
Thank you for the informative post. It is so useful and really allows me to think and plan with clarity. Just to say I think you have a done a brilliant job.
Andy C
Hi,
This looks amazing! Can I ask how you secured the metod base cabinets you stacked on top of the tall ones? And how did you overcome the fact these base cabinets come with no top surface as they are designed for a worktop?
Thanks!
The Pramshed
Hi there, thank you! The two cupboards that are stacked together are screwed together, there’s a screw that goes from the top cupboard into the one below. Also they are not base cupboards, we choose wall cupboards that come with a top to them. The top cupboards are these https://www.ikea.com/gb/en/p/metod-fridge-freezer-top-cabinet-frame-white-40205537/
Anna
Fantastic blog, love the kitchen and how you designed it!! Did you consider using Ikea fronts and if so, do you think the cost would have been the same/cheaper/more expensive? May I ask why you decided to make them yourself? I’m now considering doing similar kitchen and just wondering if I should choose Ikea front or do what you did? Many thanks Anna
Steve Mc
Great kitchen. Where did you purchase the chevron flooring?
The Pramshed
Thank you! Our builders sourced and installed it. It’s a light oak engineered chevron floors that oiled with Osmo Clear and Raw Matt oil.
Leroy
Hi, this is a great article! I’m going through the exact same process at the moment. I’ve designed my kitchen using the IKEA kitchen planner but need to visit a store to double check the design before buying the base units.
Just a question with regard the dishwasher and fridge/freezer – you say no carcass is required. Why is this?
When I plan the kitchen in the planner they always include a base unit plus their appliances. If I’m buying my own dishwasher and fridge/freezer then will it just work with an integrated door?
The Pramshed
Thank you! You need to check the width of your appliances, we bought our own appliances from AO that are 600mm wide each, too wide for a carcass as standard width is 600mm. We haven’t got a carcass for our under the worktop dishwasher and freezer as they sit inbetween two other carcasses and are fixed to that. We do however have a carcass for our full height (2m) tall fridge.
It may be that if you have a slimmer width freezer and dishwasher you need a carcass and base unit for it to sit in.
Hope that helps